- #1,751
Drakkith
Mentor
- 22,932
- 7,301
You'll get no help from me. I know just enough to use my software and that's it.
I'm working on reaching that level myself, I figured, since I don't have my own equipment that I would take advantage of the free imaging files for JWST (and maybe some others) on MAST to see what happens. Free data, free software and lots of time, what a combination. By the way, just out of curiosity, what software do you prefer for processing?Drakkith said:I know just enough to use my software and that's it.
I use Maxim DL that I bought a while back, but it's a premium software, not free.Oldman too said:By the way, just out of curiosity, what software do you prefer for processing?
Oldman too said:They also recommended using DeepSkyStacker along with the Liberator to take the edge off the learning curve for newbies (That would be me). I would appreciate any tips, advice or comments as I try and figure this stuff out.

I've got a plan for that.DennisN said:If you are stacking photos you haven't taken yourself, step 1 obviously just becomes downloading the photos from somewhere.
When I started astrophotography, I learned using Deep Sky Stacker and Lynkeos, because they were (are?) free. After a few years, as I learned more and got better, I ran up against the limitations of that software and switched to Astro Pixel Processor (not free), which I am still mastering.Oldman too said:They also recommended using DeepSkyStacker along with the Liberator to take the edge off the learning curve for newbies (That would be me). I would appreciate any tips, advice or comments as I try and figure this stuff out.
Thanks, Scott
)Lovely colors and lovely details!collinsmark said:M16, the Eagle Nebula (also called the Star Queen Nebula), imaged from my back patio in June 2022.The Eagle Nebula is roughly 7000 light-years away (sources differ), and can be seen (from Earth) in the constellation Serpens.


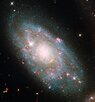
Very nice!Devin-M said:I made this bi-color one of the core of NGC 628 "Phantom Galaxy" from JWST MIRI Instrument FITs files from the MAST Portal
I also use extra hard drives. It's the most cost-effective way for large amounts of data (at least that I know of; I did a calculation comparing DVDs, Bluray disks and hard drives some years ago).Andy Resnick said:What do y'all use for 'archival' storage?
Beautiful!collinsmark said:Saturn, 2022-08-16 06:38.5 UT. Imaged from my back patio in San Diego. It was couple of days after Saturn's opposition.
We are at the cruel mercy of the heavens.collinsmark said:This repeated every night for days on end. I felt like Charlie Brown trying to kick the football as Lucy Van Pelt pulls it out from under me at the last moment. And I fell for the trick every time.
That's pretty wild!collinsmark said:the final image is a composite of around 100,000 individual images
To the contrary, would it have been as satisfying if the 1st night it all succeeded and that's it? Or would you call that cheap? Now you've achieved something which you know to be difficult. And worth the effort! :-)DennisN said:We are at the cruel mercy of the heavens.
).