Proximity Sensor, Design Project

In summary, a reflective tape measure with bar code reader can be used to measure the position of a metal shaft within an actuator assembly to within +/- 0.2mm tolerance. This solution is not ideal as it requires direct contact with the shaft. Alternatives such as a laser interferometer or a camera can be used if non-contact is required.
  • #1
mattyboson12
41
0
I've taken a year out of university to work at a design company and they have given me a project to design/make a test rig which measures the position of a metal shaft within an actuator assembly to check if its within a +/- 0.2mm tolerance. Some of the key requirements are:
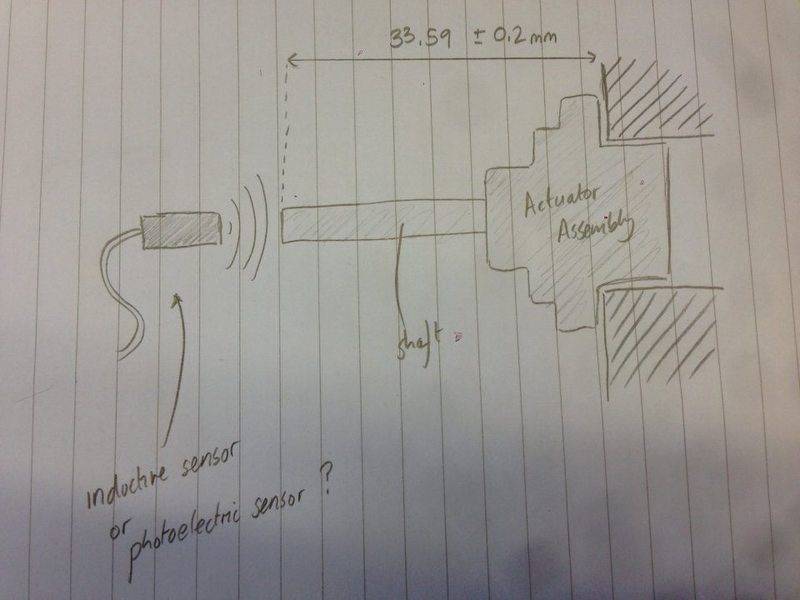
  • No contact with the shaft
  • The sensor is going to measure the end of the shaft to check if its within +/- 0.2mm tolerance. Therefore it would need to be able to read a change of less than 0.1mm.
  • Output must be repeatable as it is going to be used to measure a handful of parts off the production line
  • It needs to be easy to use/ display results clearly
  • measured shaft has a diameter of 5mm
IMG_3923.JPG

I've been looking at inductive and photoelectric sensors from http://www.baumer.com/uk-en/ however I can't find a product which can accurately measure the position of the shaft down to 0.01mm
 
Engineering news on Phys.org
  • #2
Here is one way. Reflective tape sensed by a bar code reader front end. The tape is marked with printing analogous to bar codes. But the actual code is called Gray code, which was designed specifically for this purpose. It will work better if the tape is wound around the circumference of the shaft rather than on the butt.

https://en.m.wikipedia.org/wiki/Gray_code

Edit: second thought. You may need a vernier scale in addition to the Gray code. That reminds me; I have a simple device on my boat for measuring angles to that precision. It is a sextant. It would be a fun design project to adapt the sextant principle to a rotating shaft.
 
Last edited:
  • #3
mattyboson12 said:
I've taken a year out of university to work at a design company and they have given me a project to design/make a test rig which measures the position of a metal shaft within an actuator assembly to check if its within a +/- 0.2mm tolerance. Some of the key requirements are:
  • No contact with the shaft
  • The sensor is going to measure the end of the shaft to check if its within +/- 0.2mm tolerance. Therefore it would need to be able to read a change of less than 0.1mm.
  • Output must be repeatable as it is going to be used to measure a handful of parts off the production line
  • It needs to be easy to use/ display results clearly
  • measured shaft has a diameter of 5mm
View attachment 88131
I've been looking at inductive and photoelectric sensors from http://www.baumer.com/uk-en/ however I can't find a product which can accurately measure the position of the shaft down to 0.01mm

Perhaps a laser interferometer pointed at the end of the of the actuator? You will either need to secure the assembly securely each time (a pain to do right every time) or measure both the rod and the mounting and tare (can be built into the device with some extra engineering).

This is a problem that has been solved many times. There is an industry dedicated to machine tool alignment. I'm sure you can buy a solution or build one yourself.
 
  • #4
https://www.renishaw.com/en/renishaw-enhancing-efficiency-in-manufacturing-and-healthcare--1030

http://www.mitutoyo.com/

You'll find both sites above very interesting to read and you'll pick up a lot of ideas .

As for the actual problem though you could do that with a £20 dial gauge if direct contact was acceptable .

Direct contact measurement is very common practice in this sort of application .

If non contact is essential then have a look at this sort of thing :

http://www.optimet.com/industrial.php?gclid=CJ2f5KLI2McCFUZAGwodGB4HvQ
 
Last edited by a moderator:
  • #5
Nidum said:
As for the actual problem though you could do that with a £20 dial gauge if direct contact was acceptable .

I agree. Why is there a non-contact requirement?
 
  • #6
Maybe it's exaggerated, but a camera will do it and is very flexible ( can look for other things than just the shaft position ).

Say you have a camera with a physical image width = 50mm and a line resolution = 1280 pixels, you can measure the position within ±0.0078mm ( ±0.2 pixels ).

Connect the camera to a PC ( framegrabber ), and you have a whole screen to display results, a disk to save them, a processor to calculate statistics.

The lens of the camera has some distortion, but you can correct it by an algorithm.
mattyboson12 said:
Output must be repeatable as it is going to be used to measure a handful of parts off the production line

Why don't you measure these parts directly by a camera ?
 
Last edited:
  • #7
One possiblity is a linear ccd array and lensing system that projects the end of the actuator shaft onto the ccd array. (similar to the camera solution previously suggested)
There are industrial line cameras and frame grabber systems designed for exactly this sort of thing. Not a cheap solution though, but very flexible in an industrial environment. Maybe it would have other applications in the quality control dept.

Anything you do with reflections, etc will have issues and be limited in flexibility.

Contact DALSA to get your bearings in that market.
http://www.teledynedalsa.com/imaging/products/cameras/line-scan/spyder2/S2-1X-05H40/ for example

I'm sure you can find cheaper solutions than DALSA depending on how much circuit design you want to do.
 
  • #8
A non contact measurement system may be necessary if an object is fragile or has moving parts where any hard contact could change the end length .

The cryptic word 'actuator' in the original diagram could imply a moving spindle . Depends then on how much force is needed to move the spindle any significant amount .

Non contact end length of such small parts could be done with a Mitutoyo bench laser micrometer adapted with a holding jig .

A problem with non contact end measurement is that there are no forces into the specimen to bed it down against a stop giving reliable base reference position . Holding jigs usually have to have some level of end clamping to deal with this problem .
 
  • Like
Likes berkeman
  • #9
Nidum said:
A problem with non contact end measurement is that there are no forces into the specimen to bed it down against a stop giving reliable base reference position .
With a camera, you don't have to keep the object to be measured in known position. If just the object is within the frames of the image, a program can move/rotate the object digitally, if desired. A picture can even be taken "on the fly" ( object is moving ) in strobe light, corresponding to a shutter time ≈ 1.5μs. Also the camera can detect "mechanically hidden" errors, like a scratch in the surface of the object.
 
Last edited:

Related to Proximity Sensor, Design Project

1. What is a proximity sensor?

A proximity sensor is an electronic device that is used to detect the presence or absence of nearby objects without any physical contact. It emits an electromagnetic field or beam of radiation and measures changes in the field or return signal to determine the distance between the sensor and the object.

2. How does a proximity sensor work?

A proximity sensor works by emitting an electromagnetic field or beam of radiation, such as infrared, and then detecting the changes in the field or return signal. When an object enters the field, it reflects the beam back to the sensor, which then measures the time it takes for the beam to return. Based on this time, the sensor can calculate the distance to the object.

3. What are the different types of proximity sensors?

There are several types of proximity sensors, including inductive, capacitive, ultrasonic, and optical sensors. Inductive sensors use an electromagnetic field and are commonly used in metal detection, while capacitive sensors use changes in capacitance to detect objects. Ultrasonic sensors emit high-frequency sound waves and measure their return to detect objects, and optical sensors use light to detect changes in reflectivity.

4. What are the applications of proximity sensors?

Proximity sensors have a wide range of applications in various industries. They are commonly used in manufacturing and automation for object detection and positioning. They are also used in security systems, touch screens, mobile devices, and automotive systems for detecting obstacles and controlling functions like automatic door opening/closing and parking assistance.

5. What are the key factors to consider when designing a proximity sensor?

When designing a proximity sensor, you need to consider factors such as the sensing range, detection speed, and accuracy. The type of sensor and its operating principles should also be carefully evaluated to ensure it is suitable for the intended application. Other important factors include power consumption, size, and cost of the sensor.

Similar threads

Replies
6
Views
2K
  • Electrical Engineering
Replies
4
Views
6K
  • Electrical Engineering
Replies
7
Views
13K
  • Electrical Engineering
Replies
2
Views
4K
Replies
16
Views
2K
Replies
11
Views
10K
  • Mechanical Engineering
Replies
5
Views
979
  • Sci-Fi Writing and World Building
Replies
21
Views
1K
  • Aerospace Engineering
Replies
2
Views
7K
  • General Discussion
Replies
4
Views
7K
Back
Top